
How to Create Self-Custody Merchant Accounts in 5 Minutes
- [[[Free!!]<<<<]] Watch: 스포르팅 - 토트넘 Live Stream 13 September 2022
- 2 hours ago
- 5 min read
![Writer: [[[Free!!]<<<<]] Watch: 스포르팅 - 토트넘 Live Stream 13 September 2022](https://lh3.googleusercontent.com/a/AItbvmktwQc0wCdd3ZEETSYItRQubwwBzOyjD_dcigRf=s96-c)
Stop waiting. Stop begging for permission. Traditional merchant accounts are broken. You apply, you wait, you provide three years of tax returns, and then: maybe: a bank allows you to accept money.
In the Web3 era, that process is obsolete.
With Larecoin, you are the bank. You own the rails. You control the vault. We’re talking about a setup that takes less time than brewing a cup of coffee. No KYC. No credit checks. No "pending" status.
Here is how you reclaim your financial independence and set up a self-custody merchant account in exactly five minutes.
The Problem with Legacy Processors
Before we dive into the "how," let's talk about the "why."
If you use NOWPayments or CoinPayments, you're still playing in a walled garden. These platforms often act as intermediaries. They hold your funds. They charge "processing fees" on top of network fees. They can freeze your account if their "risk department" gets a whim.
Larecoin is different. We don't touch your money. We provide the protocol; you provide the wallet.
Why Self-Custody Wins:
Instant Access: Funds land in your wallet the moment the block is confirmed.
Zero Middlemen: No one can freeze your LUSD or $LARE.
Gas-Only Transfers: Stop losing 1-3% to "processing." Just pay the network gas.
Global by Default: Accept payments from Tokyo to Toronto without cross-border surcharges.
Step 1: Initialize Your Web3 Wallet (60 Seconds)
You can't have a self-custody account without a vault. For the Larecoin ecosystem, which leverages high-speed chains like Solana, you need a compatible Web3 wallet.
Download a Wallet: Use MetaMask or Phantom.
Secure Your Seed Phrase: This is your only key. If you lose it, the money is gone. If someone else gets it, they own your business.
Copy Your Public Address: This is your "Account Number." You'll give this to the Larecoin gateway so it knows where to send your profits.
Whether you are selling a Larecoin Stainless Steel Water Bottle or high-end digital services, this wallet is where your revenue lives.
Step 2: Connect to the Larecoin Gateway (60 Seconds)
Go to Larecoin.com.
Unlike legacy platforms that require a 14-page application, Larecoin uses "Connect Wallet" logic.
Hit "Connect": Link your newly created wallet.
Verify Ownership: A simple, gasless signature proves you own the address.
Choose Your Assets: Toggle which tokens you want to accept. We recommend enabling $LARE and LUSD for maximum efficiency.
By connecting directly, you bypass the custodial traps of competitors like CoinPayments. You aren't "opening an account" with us; you're syncing your wallet to the decentralized payment rails.

Step 3: Configure LUSD for Stability (60 Seconds)
Volatility is the enemy of merchant adoption. You can't price a Short Sleeve Unisex T-Shirt in a currency that drops 10% during the customer’s checkout process.
Enter LUSD.
LUSD is the Larecoin ecosystem's answer to stability. It’s a stablecoin designed for commerce.
Set LUSD as your primary settlement: Even if a customer pays in another crypto, the gateway can route and settle in LUSD.
Predictable Accounting: 1 LUSD equals $1 USD. It makes your tax season a breeze.
High Liquidity: Move LUSD to other assets or off-ramp to fiat whenever you want.
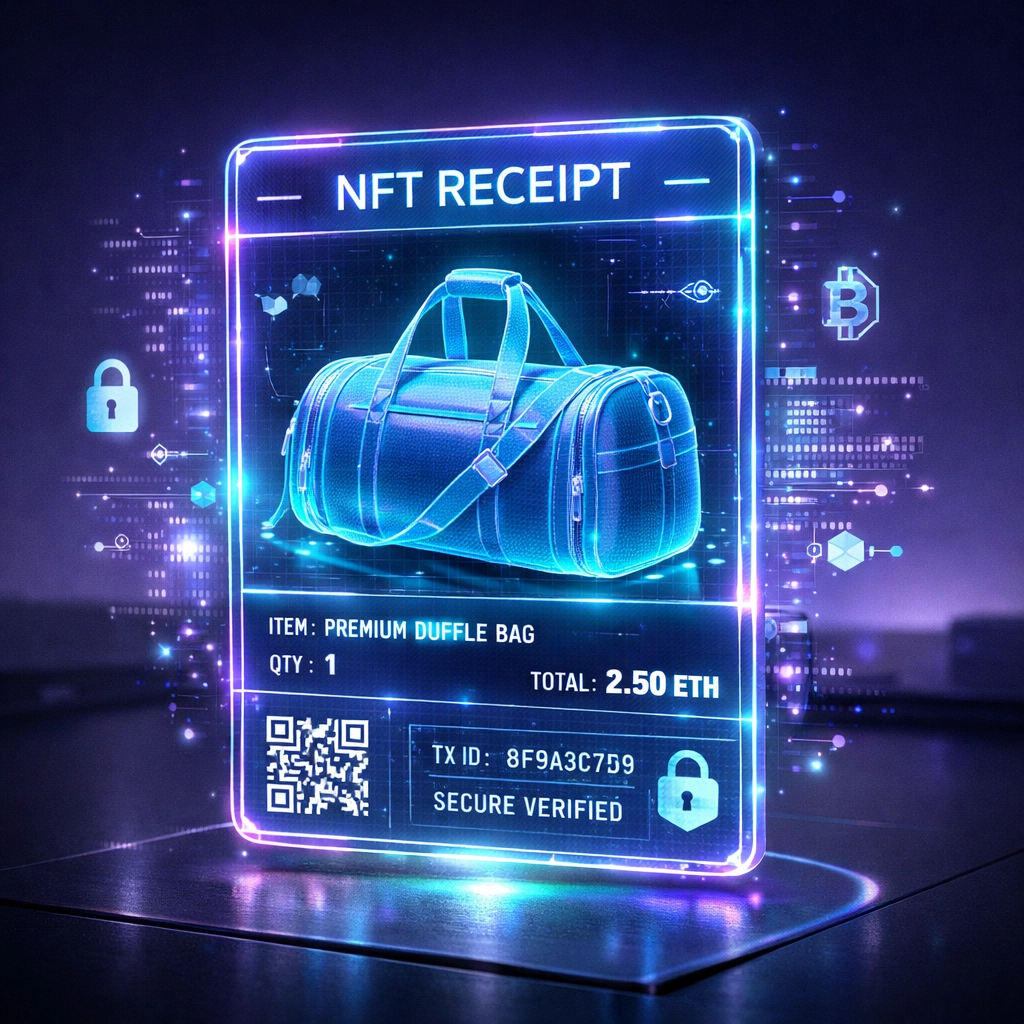
Step 4: Activate NFT Receipts (60 Seconds)
Paper receipts are garbage. Email receipts get lost in spam. Larecoin utilizes NFT Receipts.
When a customer buys your product: say, a Larecoin Duffle Bag: the Larecoin protocol automatically mints an NFT receipt directly to their wallet.
Enable "Auto-Mint": In your merchant dashboard, toggle NFT Receipts.
Customize the Metadata: Add your logo and order details.
Immutable Proof: The NFT serves as a permanent, on-chain proof of purchase. No more "I didn't buy that" chargeback fraud.
This is where Larecoin leaves NOWPayments in the dust. We don't just move money; we provide a Web3-native infrastructure for the entire post-purchase experience.
Step 5: Deploy the Checkout (60 Seconds)
Final step. You need to show the customer where to pay.
For E-commerce: Grab the Larecoin API key or use our plug-and-play SDK.
For Physical Stores: Generate a static QR code from your dashboard. Print it. Stick it on your counter.
For Social Selling: Use a "Pay Link." Send it via DM or post it in your bio.
When a customer scans that code, they aren't sending money to Larecoin. They are sending it directly to you.
Comparison: Larecoin vs. The Field
Why choose Larecoin over the "standard" options?
Feature | Larecoin | NOWPayments | CoinPayments |
Custody | Self-Custody (You hold keys) | Custodial / Hybrid | Custodial |
Setup Time | 5 Minutes | Hours/Days | Hours/Days |
Fees | Gas-Only | 0.5% - 1% + Network | 0.5% + Network |
Receipts | On-chain NFTs | Basic Email | Basic Email |
Stablecoin | Native LUSD | Third-party only | Third-party only |
The math is simple. If you process $100,000 a year, a 1% fee is $1,000 gone for no reason. With Larecoin, that $1,000 stays in your pocket.

The Merchant Freedom Manifesto
Self-custody is more than just a technical setup. It’s a statement of independence.
When you use Larecoin, you are opting out of a system that views your business as a risk factor. You are moving into an ecosystem where your "account" is a cryptographic string that no government or corporation can "turn off."
Whether you’re selling a Larecoin Snapback Hat or a Laptop Sleeve, the principle remains the same: Your work, your money.
Maximizing the Larecoin Ecosystem
Setting up the account is just the beginning. The Larecoin ecosystem is designed to help you grow.
Push-to-Card Services
Need to pay a bill in the "real world"? Use Larecoin’s push-to-card feature. Move your LUSD from your self-custody wallet directly to a debit card in seconds. No 3-day bank transfers. No "clearing" periods.
The Metaverse Integration
Are you planning to sell digital goods in the Metaverse? Larecoin is built for the virtual economy. Our gateway integrates seamlessly into Web3 environments, allowing users to buy items without ever leaving the 3D space.
AI-Driven Analytics (Coming Soon to larecoin.ai)
Keep an eye on larecoin.ai. We are integrating machine learning tools to help merchants track spending patterns, predict inventory needs (like when to restock the All Over Print Crop Tee), and optimize their checkout flow: all while maintaining user privacy.

Security Best Practices
Because this is a self-custody account, you are the Chief Security Officer.
Use Hardware Wallets: For large balances, connect a Ledger or Trezor to your Larecoin dashboard. Keep your "hot" wallet for daily transactions and sweep profits to "cold" storage.
Multi-Sig for Teams: If you have partners, set up a multi-signature wallet. This requires multiple people to sign off before funds can be moved, preventing internal theft.
Verify Every Link: Always ensure you are on https://www.larecoin.com before connecting your wallet.
Ready to Start?
The 5-minute clock is ticking. You can spend the next hour filling out a form for a legacy processor that will take 1% of your hard-earned money forever. Or, you can spend the next 5 minutes setting up a Larecoin self-custody account and join the future of commerce.
The tools are here. The fees are gone. The control is yours.
Join the movement.

Explore the Blog:larecoin.com/blog
Join the Community:Join Larecoin Telegram
Get the Gear:Larecoin Men's T-Shirt
Don't let legacy finance hold your business hostage. Go self-custody. Go Larecoin.
Comments